Not finding enough documentation on how to insert a record with a form in ADF using JDeveloper 11g, I am giving a step-by-step example. There are multiple ways of inserting records. In this example I will create a list on the initial page along with a command button that will take you to an insert page. The insert page will have a form for insertion and submit and commit buttons.
Step 1. Create the application.
Select New from the File menu. From under the category General|Applications, select Fusion Web Application (ADF), and hit OK. Use an application name and package prefix of your choice, and create a model project and a viewcontroller project using the defaults provided.
Step 2. Create an application database connection.
I will be using the hr schema as is used in many Oracle tutorials (for example, see
Oracle's Developing RIA Web Applications with Oracle ADF). In the application overview checklist, select "Create a Database Connection" under the "Connect to a Database" checklist item. Create a connection as an Application Resource to the HR schema based on your database setup. Here is an example:
Test your connection to be sure that you have configured the connection correctly.
Step 3. Create your entity object.
Right-click your Model project and select new to begin creating the entity object we will use. In the New Gallery, under the Business Tier|ADF Business Components category, select Entity Object and click OK. In the Initialize Business Components Project window that pops up, select the database connection that you just created and click OK. In the Create Entity Object window change the name to "Jobs". For Schema Object (near the bottom) click the Browse button. In the Select Schema Object window, enter a 'J' in the Object Name input box and click on the Query button. Select "JOBS" from the available objects and click OK. Your Schema Object should now say "JOBS" (a table in the hr schema). Click on the Finish button to create your Jobs entity object.
Step 4. Create your view object.
Right-click your Model project and select new to begin creating the view object we will use. In the New Gallery, under the Business Tier|ADF Business Components category, select View Object and click OK. In the Create View Object wizard, give the object the name "JobsView". The datasource type should be "Updatable access through entity objects." Select the Jobs entity object and be sure it has Updatable checked. Select all attributes. Click Next until you get to the Application Module window (Step 8 of 9 for me). Check the Application Module checkbox and click the Finish button. Click Save All. At this point your projects in your application navigator should look something like this (your packages will be named differently under Application Sources):
Step 5. Create your job list page.
Open the adfc-config.xml file by double-clicking adfc-config in your ViewController project under the Web Content|Page Flows folder and check that the Diagram tab is selected. Drag a View component onto the diagram and name it JobsList. Double-click the JobsList component that you created to bring up the Create JSF Page window. Leave the File Name as "JobsList.jspx" and be sure that "Blank Page" is selected in the Initial Page Layout.
Click OK.
From the Layout components drag a Panel Stretch Layout component onto the blank JobsList.jspx page (in Design view). From the Data Controls accordian (after you have refreshed it) in your Application Navigator drag JobsView1 and drop it into the center facet of the Panel Stretch Layout. From the context menu select Table|ADF Read-only Table. Keep all table columns and click OK. Save All. Right-click on JobsList.jspx and Run. Your running application should look like this:
6. Complete your task flow.
Re-open your adfc-config.xml page. Drag another View component onto the diagram to the right of the JobsList View. Rename the View to "JobsInsert." Click on Control Flow Case in the Components panel, then click on the JobsList View and then the JobsInsert View to create a Control Flow from JobsList to JobsInsert. Name the Control Flow "insert." Create another Control Flow going from JobsInsert to JobsList and name it "return." Save All. Your task flow should look like this:
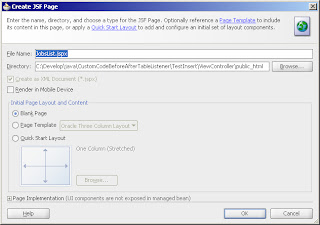
7. Create your JobsInsert form input page.
Double-click on your JobsInsert View. Create a blank JobsInsert.jspx page. From Data Controls drag JobsView1 and drop it on your empty page. Select Form|ADF Form from the context menu. Leave the fields as they are, but select the Include Submit Button checkbox. Click OK. Save All.
8. Add button to navigate to form input page.
Return to your JobsList.jspx page. In Data Controls expand JobsView1 and expand the Operations folder that is inside JobsView1. Drag CreateInsert from the Operations folder and drop it in the top facet in the JobsList.jspx page. Select ADF Button from the context menu. You will notice that your button stretches to the width of the top facet. Right-click on your button, select Surround With and select Panel Group Layout to fix this. Select the button you have created. In the Property Inspector change the text to "Insert Job" and change the Action to "insert". This tells the button to perform the "insert" action you created in your adfc-config.xml. Save All. Right-click your JobsList.jspx page and run it. Clicking the Insert Job button should take you to the JobsInsert.jspx page. However, if you enter a new job into the form and click Submit nothing happens. You will fix that in the next step. Your page should look like this:
9. Add Commit and Return functionality.
Open the JobsInsert.jspx page in JDeveloper. Click on the Submit button. In the Structure pane you will notice that the Submit button is the only component in the footer facet of the Panel Form Layout. Right-click on the Submit button, select Surround With and then select Panel Group Layout. In the Data Controls accordian expand the Operations folder that is below JobsView1, but not inside it. Drag the Commit operation and drop it in the structure pane inside the Panel Group Layout that you just created and select ADF Button from the context window. Adjust it if you need to so that it comes after the Submit button. In the Property Inspector for the Commit button set Action to "return." Save All and run the JobsList.jspx file. Go to the JobsInsert page, enter a new job, click Submit, and click Commit. Back in the JobsList page verify that your job has been inserted.


